Part 1 - SQLite Introduction and Setting up the REPL in fdb
Welcome to Part 1! Here, we’ll quickly talk about the broad overview of SQLite’s
internals (and the database we’ll make!) and then setup a basic
Read-Eval-Print-Loop (REPL) for the binary in our project fdb.
The general “flow” for a SQLite query looks like this:
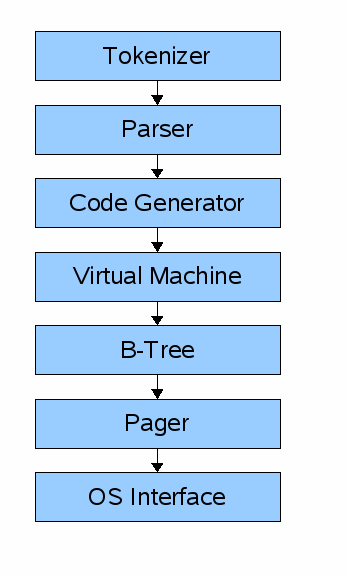
Paraphrasing part 1 of cstack’s series, the first step in executing some SQL against a SQLite database is to make the API call (in the SQLite library) with your SQL statement. That statement first hits the “frontend” of the engine which includes the tokenizer, parser, and code generator. Basically, this classic Computer Science compiler theory by taking the SQL string, turning it into a series of tokens, letting the parser make sense of those tokens (based on the semantics of the language), and then generate some bytecode to be ran in a virtual machine. Another option after the parser is to do what’s known as a tree-walking interpreter where you just walk the Abstract Syntax Tree that the parser creates. This is usually easier to conceptualize and code but it does typically affect performance since its really just a large recursive function that creates a massive stack frame along the way. We’ll follow the original design and generate bytecode.
Side note: I feel fairly comfortable with this step due to David Beasley’s excellent “Write a Compiler” course. Sadly, it’s no longer being offerred, but it was a great way to really dive into the depths of compiler design and theory. (Side note to the side note: I am not claiming I could write a tokenizer and parser for the entirety of the SQL grammer but the small subset we’ll do here, I think I can handle because of this course).
After we have bytecode generated, the next step is to hit the backend which
consists of the virutal machine, B-tree, pager, and OS
interface. The virtual machine will take the generated bytecode and
perform operations on the B-tree data structures that make up the tables and
indices of the database. When it comes down to it, it’s just a giant match
(not switch in Rust!) statement that takes action based on the instruction.
Once the virtual machine executes those operations, it hits the B-tree. The B-tree is truly the defining aspect of SQLite. The B-tree has many nodes that are each a page in length and this layer can retrieve pages from disk or write to disk by issuing commands to the pager.
The pager receives commands from the B-tree to read or write pages of data to the database file. The main function here is to properly write these pages to the correct offset in the database file and keep a cache of recently accessed pages in memory to make access quick and decide when to write them back to disk.
The pager then interfaces with the OS interface for the actual reading
and writing of files. SQLite also calls this the “Virtual File System” or VFS to
provide a generic API for opening, reading, writing, and closing files (and more!).
The OS interface then implements the actual mechanisms for the OS that the
database is running on (like Windows or Unix). cstack’s original tutorial
skipped over this portion to not have to support multiple platforms but luckily
in this tutorial, if we just leverage the Rust standard library std::fs
module, we get cross-platform support for free!
Making the REPL for fdb
cstack’s original post details the basic REPL which requires a decent more amount of work than in Rust. cstack clearly appreciates good design upfront and created a C struct for an input buffer to reuse an allocation. This is where C is a fantastic language but clearly dated and doesn’t have a lot of the niceties of a modern language like Rust. We’ll go on our own here to make the simple REPL which just accepts input from the user and only recognizes the ‘.exit’ command.
Taking from cstack’s tutorial, this is the basic usage of sqlite3 from the
command line:
$ sqlite3
SQLite version 3.34.1 2021-01-20 14:10:07
Enter ".help" for usage hints.
Connected to a transient in-memory database.
Use ".open FILENAME" to reopen on a persistent database.
sqlite> create table users (id int, username varchar(255), email varchar(255));
sqlite> .tables
users
sqlite> .exit
$
We’ll get to the point where we have something similar at the end of this post
(minus the create table line).
Of course there are great crates out there to build elegant REPL’s such as
rustyline (which gives you tab completion and history!) but we’ll do it the
hard way in this tutorial!
We want to read from stdin line-by-line, so we’ll use the standard library’s
BufRead trait to expose read_line() for easy reading. Of note, you first
have to get a handle to stdin by locking it from other threads:
use std::io::{self, stdin, BufRead, Write};

fn main() -> Result<(), io::Error> {
    let mut stdin = stdin().lock();
    let mut buffer = String::new();

    loop {
        // print out the prompt and flush the buffer to ensure it prints
        print!("fdb > ");
        io::stdout().flush()?;

        // clear the String
        buffer.clear();
        // read a line from stdin
        let _ = stdin.read_line(&mut buffer);
        // print it back out
        println!("{}", buffer.trim());
    }

    Ok(())
}
This is a simple REPL that does nothing but print the input back to the
user. I added comments in the blog post to explain some things in depth if you
are newer to Rust. One note: I decided for main to return a
Result<(), io::Error> which basically means we can propagate Error’s up to
main and print the message to the terminal on an unrecoverable Error. Other
than that, the code should be self-explanatory here.
Instead of just reading a line and printing it, now we want to take some action
based on that. In SQLite, there are two main ways to interact. There are “.”
commands which are non-SQL “meta” commands to get information from the database.
Of these, .exit is probably the easiest, it just exits the process. The other
commands are standard SQL commands that we’ll tackle later. The SQL statements
will be the bulk of our focus with the tokenizer, parser, etc. For now, we’ll
just support .exit to get the REPL started.
In Rust, the easiest approach will be to use the read_line method on the BufRead
trait which has a signature of:
fn read_line(&mut self, buf: &mut String) -> Result<usize>. We’ll have to
handle the Result. Ok(0) means EOF (i.e. the input has been closed from a
Ctrl-C or Ctrl-D). Ok(n) means n bytes were read into the buffer. This will
include the newline at the end of the line, so we’ll use trim() to remove all
leading and trailing whitespace. Any Err on the Result will be propagated
through and exit the process.
Then, we’ll match on the input and select our action based on that. To keep
main minimal (a personal goal of mine), we’ll write a helper function to
perform the command matching.
We’ll start with the modified minimal main loop that will change after
buffer.clear():
        // -- SNIP --
        match stdin.read_line(&mut buffer) {
            Ok(0) => {
                // EOF; just return (no error)
                return Ok(());
            }
            Ok(_n) => {
                // process the command
                process_command(buffer.trim());
            }
            Err(e) => {
                // print error and return it
                eprintln!("Error while reading input: {e:?}");
                return Err(e);
            }
        }
Then, with process_command, we will just convert the input to all lowercase
(to make matching case insensitive) and only take action based on the command.
(Here, we could have returned something like a Result and taken action in main
but instead we’ll just handle everything here and treat process_command as
almost like an inline function).
fn process_command(cmd: &str) {
    let cmd = cmd.to_lowercase();
    match cmd.as_str() {
        ".exit" => {
            // Exit with success
            eprintln!("Goodbye!");
            std::process::exit(0);
        }
        _ => {
            println!("Unrecognized command: {cmd}");
        }
    }
}
Pretty simple. We make another allocation (sadly) to make the command lowercase
and then match on the &str of that lowercase string. If the buffer has
.exit, we exit the application. Everything else we treat as an unrecognized
command and print that to the user.
And that’s it! 41 lines and we have a basic REPL for fdb. Here’s the entire
code at this moment:
use std::io::{self, stdin, BufRead, Write};

fn main() -> Result<(), io::Error> {
    let mut stdin = stdin().lock();
    let mut buffer = String::new();

    loop {
        print!("fdb > ");
        io::stdout().flush()?;

        buffer.clear();

        match stdin.read_line(&mut buffer) {
            Ok(0) => {
                // EOF; just return (no error)
                return Ok(());
            }
            Ok(_n) => {
                process_command(buffer.trim());
            }
            Err(e) => {
                eprintln!("Error while reading input: {e:?}");
                return Err(e);
            }
        }
    }
}

fn process_command(cmd: &str) {
    let cmd = cmd.to_lowercase();
    match cmd.as_str() {
        ".exit" => {
            // Exit with success
            eprintln!("Goodbye!");
            std::process::exit(0);
        }
        _ => {
            println!("Unrecognized command: {cmd}");
        }
    }
}
That’s it for now! Next time, we’ll work on the SQL compiler and virtual machine.
Series
This section contains the order of the series for easier navigation.
| Previous Article | Next Article |
|---|---|
| Intro | Coming Soon! |